I bought Eric Wood's The Last Samurai Rebellion supplement for The Men Who Would Be Kings some time ago, but never really got round to doing anything with it. Partly it's because I never actually did up any Satsuma Rebellion armies: if I were to do enough to cover the sample forces for the six scenarios at the back, let alone offer additional variation, I would need to do up a little over 200 more figures, which seems like a task best left for another time.
However, it only recently struck me that that doesn't mean the scenarios are somehow rendered useless. While framed around particular happenings of the Satsuma Rebellion, there's nothing so specific about them that means they couldn't be transposed back a decade to the Boshin War. So that got me thinking. After flipping through, I decided that Scenario 4, 'Inspector Ikebata and the Dead Man's Diary', would probably be best as a first dip into it, given that it involves the fewest number of special rules.
The scenario itself is based on two episodes from the siege of Kumamoto during the Satsuma Rebellion. The first saw a detachment of armed policemen made an attempt to sally out against the rebels, only to be pinned down under fire, so more troops from the imperial garrison went out to cover their retreat, leading to the rebels reinforcing, and so on, causing a brief but bloody firefight. The second involved a rebel officer rather unaccountably taunting the imperial army and getting shot for his trouble, while carrying a diary that provided valuable intelligence to the garrison.
On the table, this is represented by effectively dividing the action across two halves of the table. In one half you have a high-quality but poorly-led unit from the defending side which starts out Pinned within range of a forward-deployed unit from the besiegers. In the other half you have the dead man right between the two sides, who must try to move to take the diary back to their own lines. 1 point is scored by the defenders if they are able to move their forward unit off the table by their long edge, while 1 point is scored by the attackers if they destroy the unit or get lucky and kill its officer. 1 point is also scored by whichever side manages to carry the diary back to their own lines by moving a unit off their own long table edge with it. 0 points are scored if the beleaguered unit or the diary are still in no man's land by the end of turn 10.
The unit lists in the supplement don't exactly follow the points valuation that you would expect from modifying profiles in the core rules, which presumably was for reasons of balancing. However, I decided to presume that if you did swap over to the core rules, you would still be all right as long as you employed those consistently and didn't try to mix and match. So, the defenders would have a 6-point unit on-table and pinned, in range of a 5-point unit of the attackers, with Obsolete Rifles if possible. Both sides then get a further 20 points of units to be deployed up to 12" in from the edges.
What remained was coming up with some kind of vaguely historical basis for the scenario. I decided on the brief siege of Aizuwakamatsu Castle in October 1868, with the defenders being a relatively heterogeneous force of Aizu troops up against a small but elite contingent of imperial forces. The forces would be as follows:
Aizu:
- Suzakutai (Vermillion Bird Corps): Regular Infantry (6pts; on-table)
- Byakkotai (White Tiger Corps): Poorly-Armed Regular Infantry who are Poor Shots (4pts)
- Seiryutai (Azure Dragon Corps): Poorly-Armed Elite Regular Infantry (6pts)
- Genbutai (Black Tortoise Corps): Poorly-Armed Regular Infantry (5pts)
- Shinsengumi (New Select Group): Fierce Veteran Tribal Infantry (5pts)
- Satsuma Infantry: Poorly-Armed Regular Infantry (5pts; on-table)
- 2x Chōshū Infantry: Regular Infantry (6pts each for 12 total)
- Tosa Infantry: Regular Infantry who are Sharpshooters (8pts)
The Table
I decided to keep the same dimensions as in the book, which meant a 6 by 4 area. The table you see here is 8 feet wide by 6 deep, so we played using the middle two quarters. The mat is actually 6 by 5 feet, hence the inclusion of some decorative terrain features to mark the actual back-line for both sides.

As described in the scenario book, the terrain is relatively bare. Just in front of the imperial deployment area is a sparse grove that provides cover but does not impede movement, while the Aizu deployment area is marked by four palisades, again providing cover but not counting as obstacles. The forward imperial unit is also occupying such a piece. The dead man is in the centre of a hill, which obstructs firing but does not slow movement either. This means a lot of open terrain to manoeuvre in and fire across.
The deployment was surprisingly close, all told, and this had some rather deleterious effects as I will get into later. The defenders' forward unit starts just outside of short rifle range of the attackers', and the two main forces are deployed up to 1 foot in from their back edges. This means that the armies are a whole 2 feet apart... which is long rifle range for Modern Rifles. Oh dear.
The Setup
Leader qualities were decidedly lopsided, thanks to the dice gods showering favour upon my Imperial opponent while withholding it from me. Three of the Imperial units had 5+ Leadership (the number on 2D6 you need to roll to activate), save for one Chōshū infantry which was a 6+. Leader traits were a spread of decent to poor: the Satsuma infantry had a Fine Swordsman (+2D6 in melée), one Chōshū infantry was led by a Cad (the distance for forced retreats is doubled), the other by a Bag of Nerves (has a chance to flee the first time the unit becomes Pinned), and the Tosa sharpshooters had a Sporting Umpire (cannot fire at a Pinned enemy if a non-Pinned enemy is eligible).
By contrast, the defenders' forward unit has to have a poor officer, with Leadership of 7+ and the special Arrogant trait, meaning his unit had its Discipline modifier reduced by 1 and had no Free Action. The remaining Aizu line infantry were all 6+, and the Shinsengumi were a 7+. The White Tigers were led by a Bag of Nerves, and the Shinsengumi – worst of all – had a Shirker (cannot fire or initiate melée until fired upon or attacked). The Azure Dragons had a Musketry Buff (Leadership counts as 5+ for firing) but given that they had Fire as a free action this was worthless. The Black Tortoises managed to get lucky and scored 'He's the Major-General's favourite nephew, you know' (one free unit upgrade) – this I decided would be to swap their Obsolete Rifles for Modern ones, increasing their range to 24".
I got to deploy first and chose to lay my forces out along a broad front, with the Azure Dragons positioned to fire on the Satsuma infantry, the Black Tortoises moving up into the wood, the White Tigers going along the side of the hill, and the Shinsengumi aiming to go up the hill to seize the diary. My opponent decided on a more conservative approach and deployed all three of his units across the middle, reasoning that his 24" rifle range would let him cover more or less the entire vital area of the table.
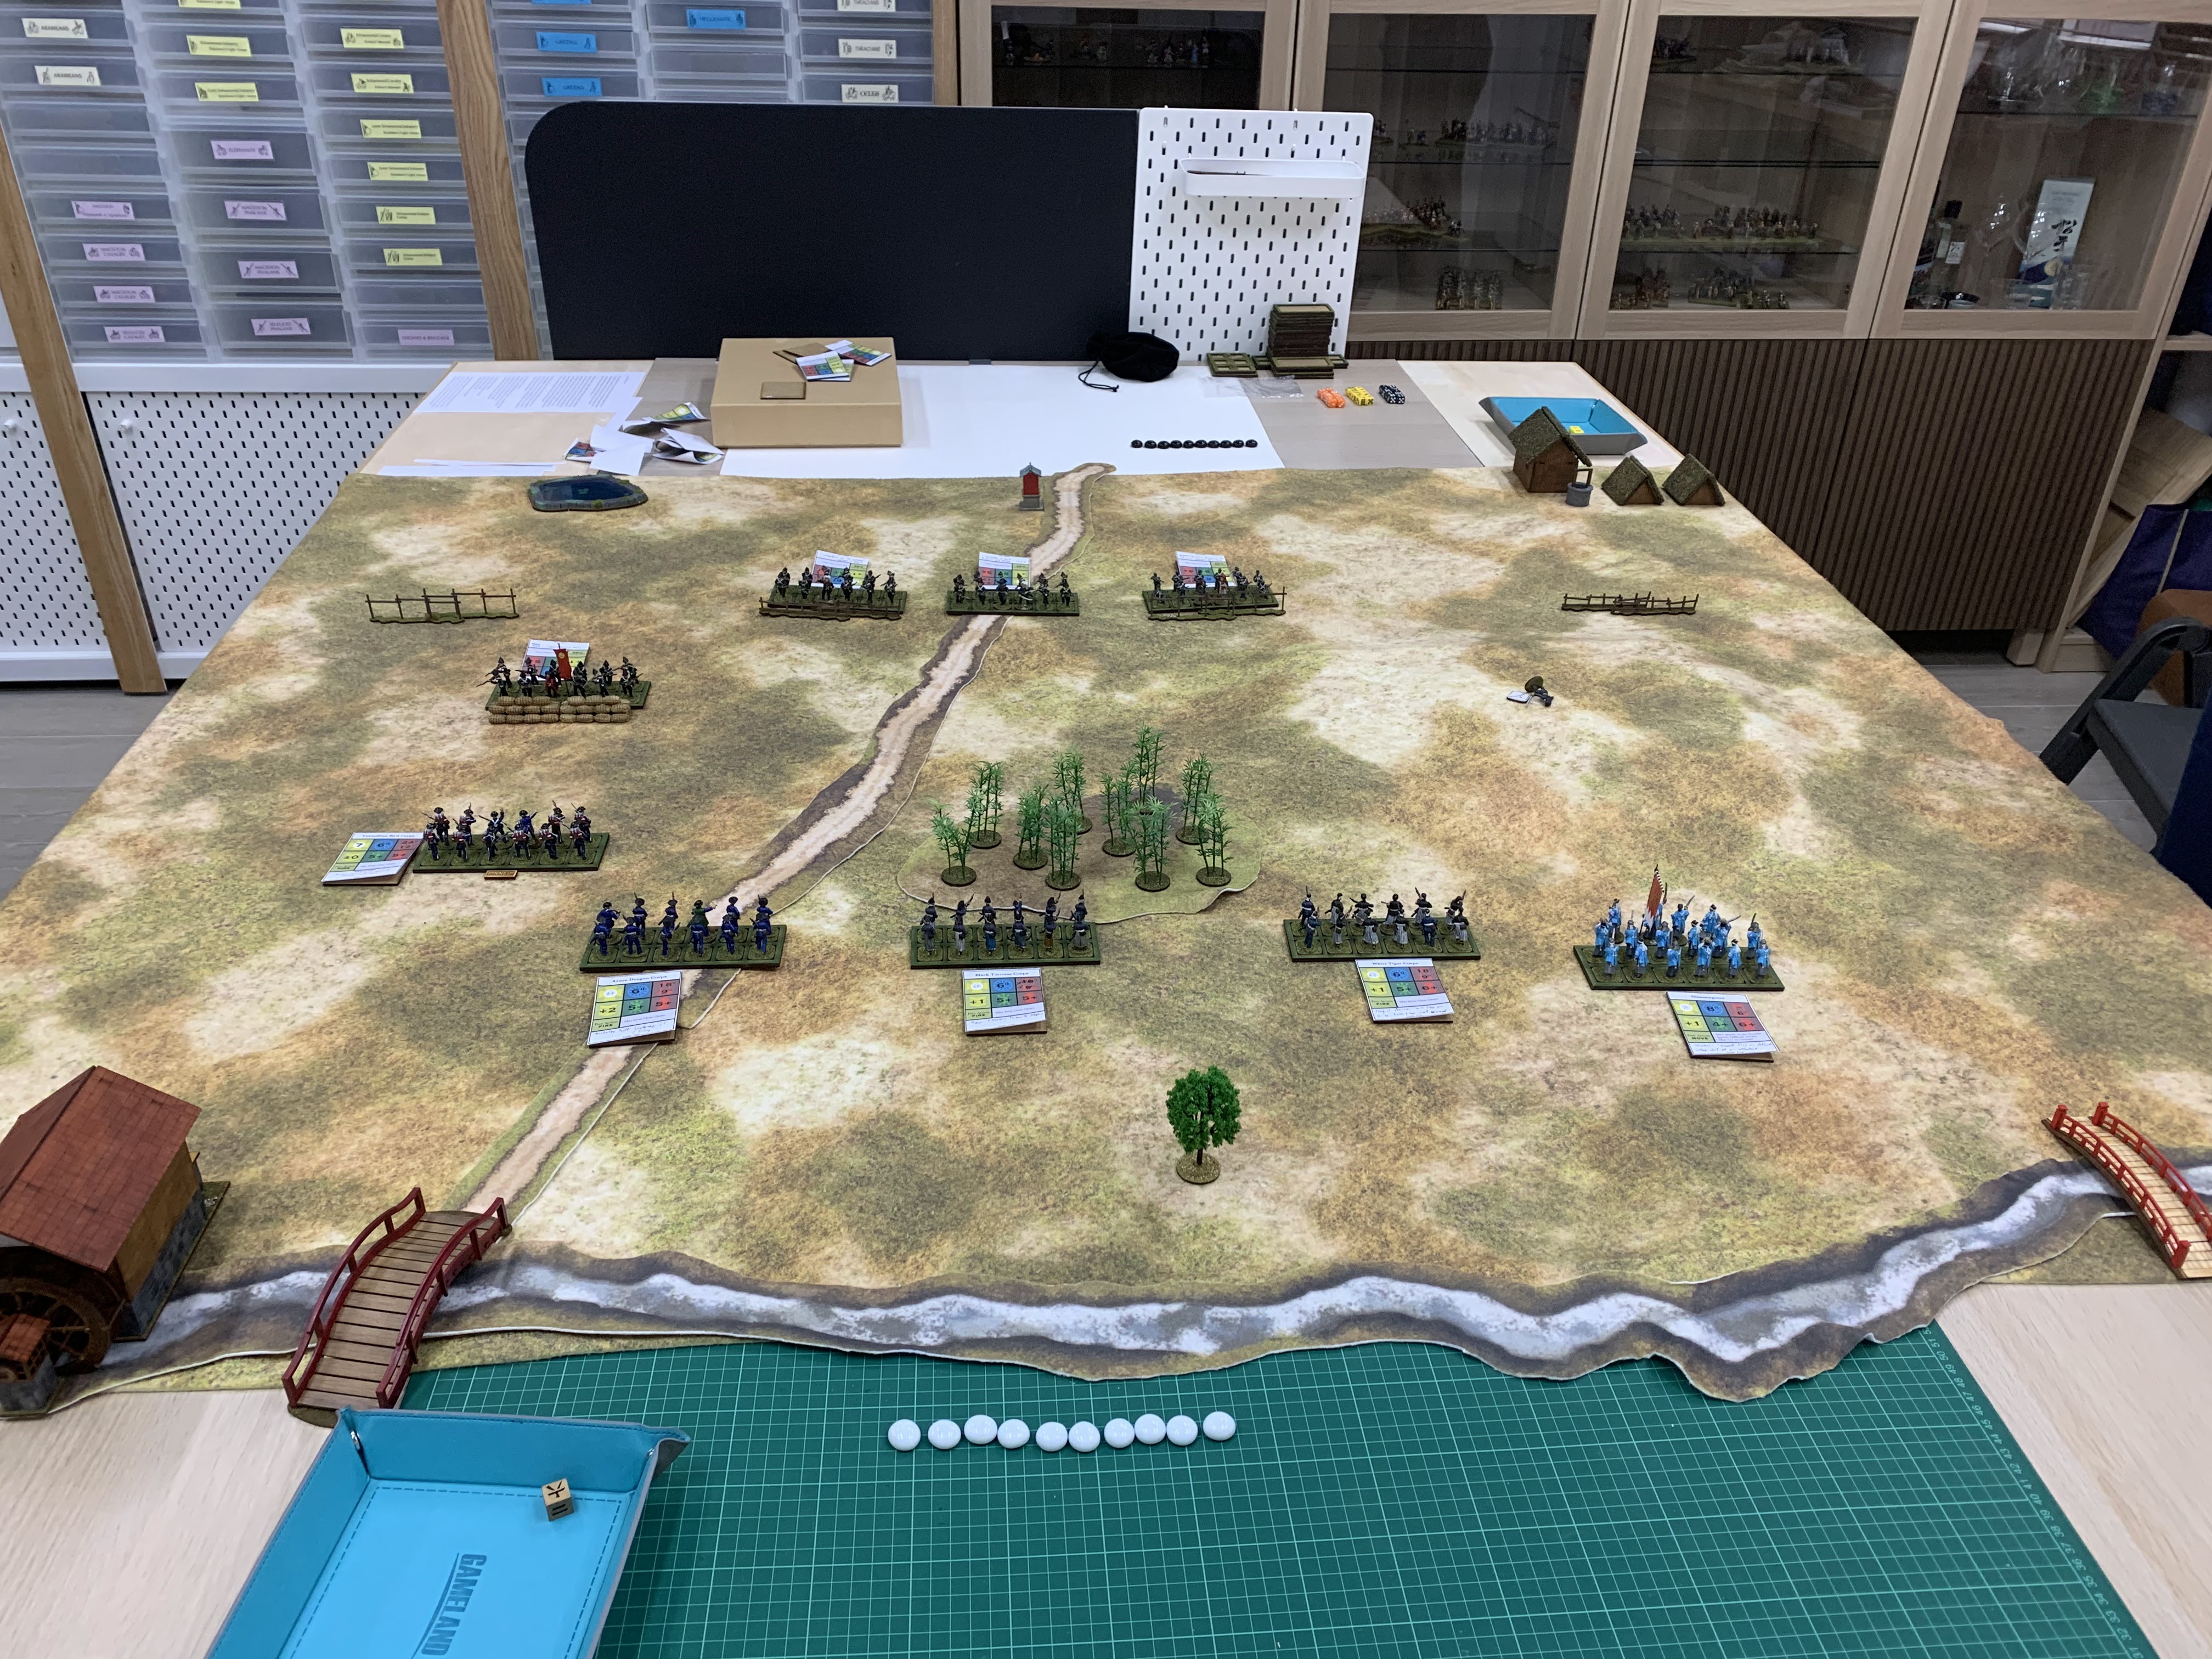 |
| The initial deployment as viewed from the Aizu side. |
The Game
 |
| Aizu turn 1: On the left, the Vermillion Birds fail to rally, but the Azure Dragons get a good shot off and kill 2 Satsuma infantry – though fail to Pin. In the centre, the Black Tortoises and White Tigers forge ahead, and on the right, the Shinsengumi get a lucky 6 after activating to move At the Double, getting them 14 inches ahead and thus right on top of the dead man. |
 |
| Imperial turn 1: Witheirng fire erupts across the line; 10 Aizu men out of 64 lie dead already. |
 |
| Aizu turn 2: The Vermillion Birds not only fail to rally, but rout outright, forcing Pinning tests on the Azure Dragons and Black Tortoises. The Dragons pass, and manage to take out another Satsuma rifleman, but the Tortoises fail and so miss out on being able to act this turn. The White Tigers rally successfully... sort of (we'll get to that in a bit); the Shinsengumi fail and must retreat 4". |
 |
| Imperial turn 2: Yet more fire. Another six Aizu men are killed, and the Azure Dragons are now also Pinned. Not only that, but the Black Tortoises suffer two more Pins due to enemy fire. The White Tigers manage not to take a Pin. For now. |
 |
| At the start of Shogunate Turn 3 we realised that we had forgotten to test for the Bag of Nerves with the White Tigers back on Turn 1. Deciding that we would retroactively re-Pin the unit if it turned out the Leader had run off (they had rolled a 7, enough to pass with the Leader but not without), I rolled a 4 which meant the Leader had run off and the unit was retroactively re-Pinned. The Azure Dragons and Shinsengumi were able to rally, but the Black Tortoises were not, falling back 3 inches. |
 |
| Imperial Turn 3: Yet more devastating fire this turn, as the Satsuma infantry and one of their Chōshū allies unloaded into the Azure Dragons and killed five of them – but shockingly failed to cause a Pin. The Black Tortoises were less lucky, taking another Pinned marker after a further two casualties, and the White Tigers, now leaderless, took two losses and another Pinned result. |
 |
| Aizu Turn 4: The last two Azure Dragons beat a hasty retreat, while the Black Tortoises failed to rally and retired. The White Tigers rallied but could perform no other action. The Shinsengumi were ordered to charge at the Imperial lines as a final diversionary attack... only to fail their activation roll. |
 |
| Imperial turn 5: The Satsuma infantry advanced while the Chōshū infantry unloaded into the White Tigers and took out another five of them; the Tosa troops, with no enemies in range, opted to remain in place. |
 |
| Aizu Turn 6: Neither of the Pinned units rallied, and the unpinned units beat a hasty retreat. At this juncture I called it quits. |
 |
| However, just to see what would happen, we tried to see if the Tosa unit could successfully capture the diary (represented here with a little MDF token which I had painted a map onto) in the five turns before the end of the game. The unit managed to roll a 6 on its first At the Double test, moving it into capture range, stopped for a turn as required by the rules, and then passed three successive activation tests and rolled a combined 15 for extra movement, allowing it to get 33" of movement and bringing it safely off the table. As the edge of the table was only 22" away, it could have failed one of those activations and still succeeded had its movement dice still come up the same. But we found that that was definitely cutting it close, and had they failed an activation and/or had more average movement dice, they might not have managed. |
 |
| The sad state of affairs at the end of the day, with the Tosa force taking the diary and leaving. |
Debrief
I think it's fair to say that the Aizu force could have made a better showing. I can think of three main reasons as to why they didn't.
Firstly, bad dice rolling, especially during the setup stage. Having poor Leadership is generally a problem, and in this game the Aizu force was basically one Leadership worse across the board. Even then, though, bad rolls meant that a lot of Pins were taken and, critically, the objective unit on the left routed on turn 2, which meant that at that stage I had to take the diary to force a draw. Unfortunately, whoever goes up to take the diary has to spend two turns under fire, and that means you really want a good Leadership unit that can potentially avoid getting Pinned as a result. I suspect the Black Tortoises could have served as that unit, but the open terrain on this table meant that the hill was the only place the Shinsengumi were useful.
Secondly, a bad plan. I really should have gone all in on one objective or the other and hoped for the best, but by going for a diffuse approach I just exposed myself to a load of simultaneous fire and ended up with most of my troops out of action from the start.
Thirdly, I think the scenario was not necessarily thought out brilliantly. My Imperial opponent was entirely correct to put his riflemen in the middle and just blast away at any of my men who tried to do anything. Flipping through the core scenarios for TMWWBK, most scenarios involve the forces a fair distance apart; those that have opposing units within 24" of each other tend not to have it where the entirety of both forces is exposed to that level of fire. Even for a simple battle setup on a 6 by 4 table, you would still most likely have the armies starting on the edges, meaning you'd still have just under 4 feet of distance at the start of the game. This extra foot of distance per side would be where things like activation failures and variable At the Double movement rates come in to give engagements a bit more fluidity, instead of creating a situation where the side that moves first is the side that gets shot up first. The concepts behind the scenario were fine, but the two sides really ought to have an extra foot of distance between them.
I suspect the problems were less pronounced in the original scenario with the sample forces suggested. In that, the besiegers (Satsuma rebels) are a mostly melée force that have to push forwards, while the defenders (Imperial garrison) have only two unpinned rifle units – plus a poorly-led one that starts Pinned – and one elite melée unit of their own, which would make an assault by six units harder to simply stall by fire. The version we played saw a firepower advantage for the besiegers, making the defenders' relief of the beleaguered unit that much trickier, and also making the capture of the diary near impossible.
I'll have a go at some more of these scenarios in the coming weeks, but I'm beginning to suspect that these were generally balanced around the Rebel side necessarily being mostly melée troops with some rifles while the Imperial force is mostly rifles with maybe some melée, which maybe doesn't quite work for the Boshin War where the latter usually describes both forces.


_-_Google_Art_Project.jpg)


