Escaping from Stalag Luft, Part 1
Phew, it's been a while since I wrote anything here, isn't it?
So, for reasons of life circumstances (i.e. graduate school) I've temporarily relocated, and my time will be split across there and home for the next few years. The combination of time commitments and complex logistics are necessarily making it a little harder to do big, ambitious projects like the Boshin War, but I've not been idle! I have some friends over here who have mostly done 28mm WW2, and so that is the direction I too am (temporarily) heading in until I have a decent pool of forces for that, and can then turn my attentions back to other periods.
02 Hundred Hours, which I first encountered at the club near my old university back in the early summer of 2022, seemed like a good way to ease into the period and get some games going. After a quick intro game earlier on, we agreed to have a go at the Escape from Stalag Luft scenarios when an opportunity became available. Said opportunities are a little constrained by our host, P.H., who has all the terrain and table space, and unfortunately nobody else was available the same day he was. Still, this would be the only chance before heading home for Christmas, so on a blustery Saturday morning we set ourselves up in his thankfully well-heated basement.
For the uninitiated, 02 Hundred Hours (henceforth 0200 for short) is a game for roughly squad-sized night actions with asymmetric forces and objectives: a smaller but qualitatively superior force of attackers with greater freedom of action is pitted against a larger but qualitatively inferior force of defenders that starts out with relatively constrained rules of engagement. The defender starts out with only a portion of their troops deployed along a designated patrol route, which the attacker gets to approach from a direction of their own choosing with their entire force. However, the defenders' suspicion slowly ticks up, and only gets stronger as attacking troops get noticed, until the alarm is raised, letting the defender counter-attack with their reserves. The attacker accumulates Order cards that allow for free actions, while the defender draws Event cards that frustrate the attacker's plans.
Or at least, that's how the vanilla game goes. Most of the game's expansions simply add more troop types and action cards, but Escape from Stalag Luft III offers a distinctly different game mode, with the attacker now taking charge of an unarmed group of POWs who must rely on their wits rather than their arms to slip past the enemy into the night. The set also comes with a small campaign booklet, with five unlinked but chronologically-sequenced scenarios based mainly (though not wholly) on scenes from The Great Escape. For fun, I decided to do up a little map, roughly following the route of Escapee #18, Bram van der Stok, a Dutch escapee and one of only three of the 76 to make it out of occupied Europe, managing to reach the Netherlands by train and then trudging southwards through Belgium and France to the Spanish border. This particular escapee inspired the Australian "Bluey" Sedgwick, played by James Coburn, in the film. The slight deviation was for Mission 1, in which a group of prisoners attempt to escape while being transported to the camp; this seems to be based on Roger Bushell's successful escape from a train in Hannover in 1942, so I placed that there as well. Not that it all really matters that much, but I thought it added some atmosphere.
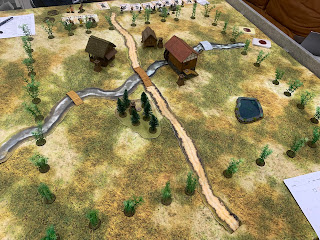
Speaking of Mission 1, some good luck made it turn out a bit lopsided. The six escapees leave the barn where they are being held by a randomly-determined corner; this just so happened to be the corner that was not covered by any sentries.
 |
| Lt. Travis thanks his good fortune |
Unfortunately, that reprieve would not last as a party of German sentries came dangerously close to the exit, forcing the airmen to bunch up right behind the unsuspecting rifleman by the cowpen (pictures unfortunately not forthcoming).
 |
| In the absence of specialised barracks buildings we opted to just use a few ordinary houses of about the right dimensions. |
We swapped sides after the first game so that I controlled the Germans, and I decided I would set up my patrol route mainly to encircle the buildings as people went in and out. To win, the Germans have to either catch three prisoners in the act, or raise the alarm. However, unlike a normal game, simply getting close enough to an enemy figure doesn't automatically cause detection; the camp guards would have to either roll to spot the prisoners, or the prisoners would have to accidentally reveal themselves during an action. Unfortunately, neither of these happened that much.
The POWs moved quickly to secure objectives, and with some good rolls were able to simply slip past the guards without arousing any suspicion.
The only objective I managed to actively prevent the prisoners from achieving was scattering the dirt, which I did by planting a pair of sentries on the objective marker and refusing to move them. In the end, the prisoners won a total victory without anyone getting caught.
I got a lucky break early on when my commander was able to sneak up behind P.H.'s NCO, with fatal results:
Disaster nearly struck when some streetlights turned on suddenly, one exposing the dead body and the other illuminating the door to the restaurant, making it risky for any of my men inside the building to leave. Fortunately, the escapee leader was able to toss the NCO's body into the restaurant conservatory, and steal his gun in the process.
I then had a yet another piece of good fortune when I used an order card to take out a pair of sentries that were watching the restaurant door. This left P.H. with just two men on the board, hoping desperately that he might raise the alarm and bring his reserves on.
In a rather astonishing move, I decided to opt for haste over sense and only moved one of the two bodies to begin with, only to realise that one of P.H.'s last sentries was only moments away from getting close enough to bring the other one under close watch and thus getting extremely close to raising the alarm:
Unfortunately (for him), no. While he did get some shots off, he missed, and the two were able to flee the table. However, things now developed in the middle as Major Dodge, carrying a 3-point objective that would be the deciding factor between victory and defeat, needed to make that final dash to the exit. Would he make it? Frustratingly, he failed to break down the door on his first attempt (good grief, what is that Brawn rating of 3 for if you can't do something as simple as that!) and was at risk of being intercepted by troops coming in from the other edge. P.H. was also able to use an Event card to sneakily keep Dodge outside the door for another activation:
P.H. got a pair of sentries into position to fire at the Major on the next turn... Only for my escapee commander, with his looted submachine gun, to make his presence known in lethal fashion.
With another sentry on the table in firing position, time was of the essence. On the left, the last two escapees ended up in a frustratingly inconclusive brawl with the German officer, who kept missing at point blank range with his pistol while the escapees were completely unable to land a hit in close combat. Not that it mattered all that much, as Major Dodge finally broke down the front door and reached the back, one move away from freedom.
At this point it was 4:00 and we decided it would be better to suspend things here and play out the last two scenarios at a later date, provisionally in late January since we would both be away for much of the holiday season. With all three games going to the Allies, we took a moment to wonder if it was all just a bit of bad luck. Mission 3 had definitely gone a bit pear-shaped due to the Germans' rapid losses at the start, and were it not for me being hasty and failing to move that last body in time, the alarm would probably never have been tripped and I'd have got away with everything scot-free. We'll see if the Allies have a similarly easy time in the concluding missions, as and when we get to those.


Comments
Post a Comment